React에서 API 데이터 불러오기 완벽 가이드 | useEffect와 fetch 실전 패턴
React useEffect로 API 데이터를 불러오는 방법을 실제 프로젝트 코드와 함께 설명합니다. fetch, 커스텀 훅, 로딩/에러 처리까지 실전 패턴 총정리.

React에서 API 데이터를 불러오는 것은 실무에서 가장 자주 사용하는 패턴 중 하나다. 이 글에서는 useEffect를 사용해 API 데이터를 불러오며 상태 변화와 렌더링이 어떻게 연결되는지 실제 프로젝트 경험을 기준으로 정리했다.
API 호출을 이해하려면 먼저 JavaScript 비동기 처리와 React useEffect 기초를 알아야 한다.
⭐️ 프로젝트 목표
🎯 이번 프로젝트에서 배울 것
- API 함수 만들기 (
getProductsApi) useEffect()로 데이터 호출map()으로 리스트 렌더링- 로딩 및 에러 UI 분기 처리
axios는 다음 미니 프로젝트 때 반영할 예정
🎬 결과 미리보기

1️⃣ 프로젝트 구조
1
2
3
4
5
6
7
8
9
10
11
12
13
14
15
src/
├── api/                        # API 요청 함수
│   └── getProductsApi.js
│
├── products/                   # 상품 관련 기능 전용 폴더
│   ├── components/
│   │   └── ProductCard.jsx     # 개별 상품 카드 UI
│   │
│   ├── hooks/                  # 상품 데이터 관련 훅
│   │   └── useProductsList.js
│   │
│   └── pages/                  # 상품 관련 페이지
│       └── ProductListsPage.jsx
│
└── App.jsx                     # 앱 전체 엔트리 포인트
🔍 데이터 흐름
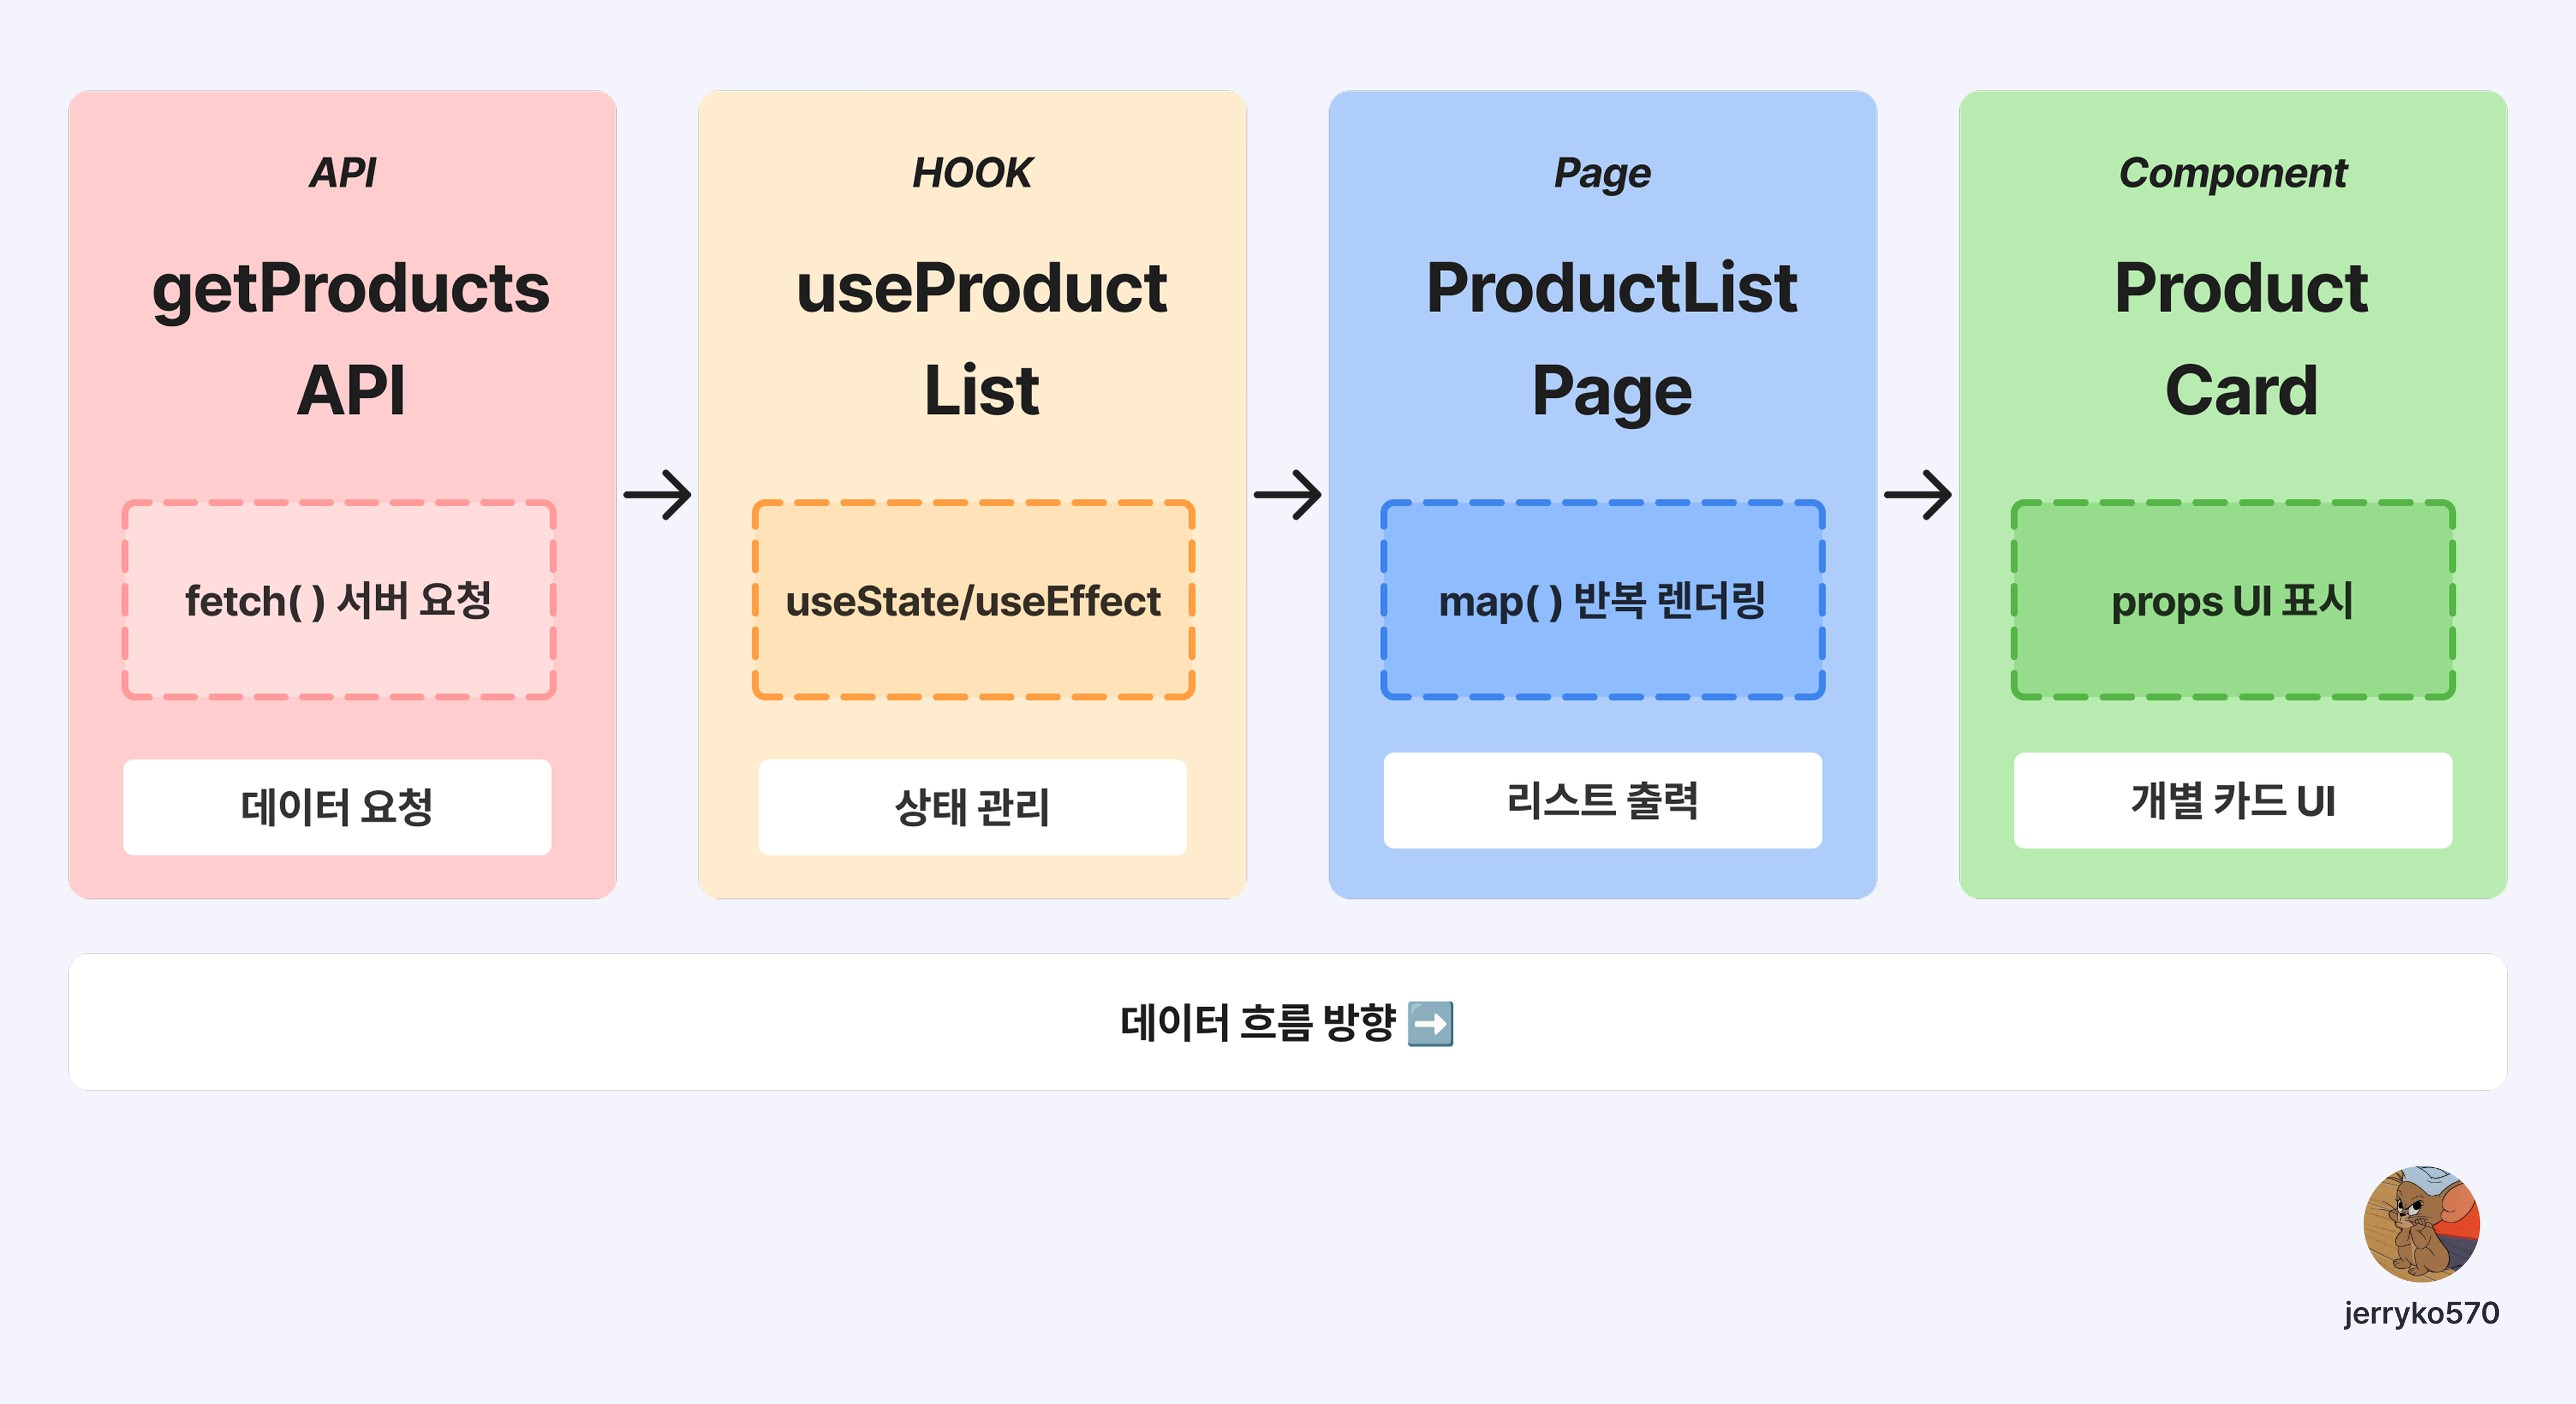
2️⃣ API 함수 만들기 - getProductsApi
fetch와 async/await로 서버에 상품 데이터를 요청하고 JSON 형태로 응답받는다.
1
2
3
4
5
6
7
8
9
10
11
12
13
14
15
16
17
18
19
20
21
// src/api/getProductsApi.js
export async function getProductsApi() {
  try {
    // 1. 서버 요청 (Request)
    const res = await fetch('https://fakestoreapi.com/products');

    // 2. 응답 검사 (200~299 외엔 오류 처리)
    if (!res.ok) {
      throw new Error(`상품 데이터를 불러오지 못했습니다. (${res.status})`);
    }

    // 3. JSON 변환 (문자열 → JS 객체)
    const data = await res.json();
    return data;

  } catch (err) {
    // 4. 오류 처리
    console.error('ProductsApi err:', err);
    return null; // 앱이 멈추지 않게 빈값 반환
  }
}
📌 fetch 흐름 정리
| 단계 | 코드 | 설명 |
|---|---|---|
| 1 | await fetch(url) | 서버에 요청, Promise 반환 |
| 2 | res.ok 검사 | 응답 상태 확인 |
| 3 | await res.json() | JSON → JS 객체 변환 |
| 4 | catch | 에러 발생 시 처리 |
3️⃣ 커스텀 훅 만들기 - useProductList
데이터 로직을 컴포넌트에서 분리해 재사용성과 가독성을 높인다.
1
2
3
4
5
6
7
8
9
10
11
12
13
14
15
16
17
18
19
20
21
22
23
24
25
26
// src/products/hooks/useProductList.js
import { useState, useEffect } from 'react';
import { getProductsApi } from '../../api/getProductsApi';

export function useProductList() {
  const [products, setProducts] = useState([]);
  const [loading, setLoading] = useState(true);
  const [error, setError] = useState(null);

  useEffect(() => {
    async function fetchData() {
      try {
        const data = await getProductsApi();
        setProducts(data || []);
      } catch (err) {
        setError(err.message || '데이터를 불러오지 못했습니다.');
      } finally {
        setLoading(false); // 무조건 로딩 종료
      }
    }

    fetchData();
  }, []); // 빈 배열: 마운트 시 1회만 실행

  return { products, loading, error };
}
🔍 왜 커스텀 훅으로 분리할까?
4️⃣ 상품 리스트 페이지 - ProductListPage
map() 메서드로 상품 배열을 순회해 각 상품을 ProductCard로 렌더링한다.
1
2
3
4
5
6
7
8
9
10
11
12
13
14
15
16
17
18
19
20
21
22
23
24
25
26
27
28
// src/products/pages/ProductListPage.jsx
import { useProductList } from '../hooks/useProductList';
import ProductCard from '../components/ProductCard';

export default function ProductListPage() {
  const { products, loading, error } = useProductList();

  // 로딩 상태
  if (loading) return <p className="text-center mt-10">⏳ 로딩 중...</p>;

  // 에러 상태
  if (error) return <p className="text-center text-red-600">{error}</p>;

  // 정상 렌더링
  return (
    <div className="grid grid-cols-2 sm:grid-cols-3 lg:grid-cols-4 gap-8">
      {products.map((item) => (
        <ProductCard
          key={item.id}
          title={item.title}
          price={item.price}
          image={item.image}
          category={item.category}
        />
      ))}
    </div>
  );
}
📌 조건부 렌더링 패턴
1
2
3
if (loading) return <Loading />;  // 1순위: 로딩 중
if (error) return <Error />;      // 2순위: 에러 발생
return <Content />;               // 3순위: 정상 데이터
5️⃣ 상품 카드 컴포넌트 - ProductCard
개별 상품 정보를 받아 카드 UI로 렌더링한다.
1
2
3
4
5
6
7
8
9
10
11
12
13
14
15
16
17
18
19
20
21
22
23
24
25
26
27
28
29
// src/products/components/ProductCard.jsx
export default function ProductCard({ title, price, image, category }) {
  // 카테고리별 뱃지 스타일
  const badgeStyle = {
    "men's clothing": 'bg-blue-600 text-white',
    "women's clothing": 'bg-pink-500 text-white',
    'electronics': 'bg-green-600 text-white',
    'jewelery': 'bg-yellow-400 text-black',
  };

  const style = badgeStyle[category] || 'bg-gray-500 text-white';

  return (
    <div className="flex flex-col items-center max-w-[250px]">
      <img
        src={image}
        alt={title}
        className="w-[250px] h-[250px] object-cover rounded-[24px] border border-gray-200 mt-6"
      />
      <h1 className="text-lg font-semibold mt-4 text-center line-clamp-2">
        {title}
      </h1>
      <p className="text-gray-700 text-md mt-1">{price} 달러</p>
      <div className={`mt-3 px-3 py-1 rounded-md text-sm font-semibold ${style}`}>
        {category}
      </div>
    </div>
  );
}
6️⃣ 결과 확인하기
7️⃣ 자주 묻는 질문
useEffect 안에서 async 함수를 직접 쓸 수 없나요?
useEffect의 콜백 자체는 async로 만들 수 없다. 내부에 async 함수를 선언하고 호출하는 패턴을 사용해야 한다.
1
2
3
4
5
6
7
8
9
10
// ❎ 잘못된 방식
useEffect(async () => {
  const data = await fetchData();
}, []);

// ✅ 올바른 방식
useEffect(() => {
  async function fetchData() { ... }
  fetchData();
}, []);
fetch 대신 axios를 써야 하나요?
둘 다 가능하다. fetch는 내장 API라 별도 설치가 필요 없고, axios는 에러 처리와 인터셉터 기능이 편리하다. 프로젝트 규모에 따라 선택하면 된다.
로딩 상태는 왜 필요한가요?
API 응답이 오기 전에 화면이 비어 보이는 문제를 방지한다. 사용자에게 “데이터를 가져오는 중”임을 알려주는 UX 개선 효과가 있다.
8️⃣ 배운 점 정리
이번 미니 프로젝트를 통해 배운 핵심 포인트:
👉🏻 비동기 흐름 이해
fetch()는 바로 데이터를 반환하지 않고 Promise를 반환하기 때문에 await로 기다린 뒤 값을 받아야 한다.
👉🏻 로딩/에러 상태 분리
데이터가 없을 때 화면이 비어 보이는 문제를 해결하려면 loading과 error 상태를 따로 관리해야 한다. finally 구문으로 무조건 로딩 종료를 표시하는 패턴이 유용하다.
👉🏻 컴포넌트 분리의 중요성
useProductList() 커스텀 훅으로 분리하니 재사용성도 높고 코드도 한눈에 보기 좋아졌다. 데이터 로직은 hooks, 화면 로직은 components라는 구조의 중요성을 체감했다.
관련 글
👉 React 초보자를 위한 props와 async API 이해하기
👉 React 입문 가이드 - JSX와 컴포넌트 기본 개념